How to Print a Shipping Label at Home With No Experience
TLDR
You can print a shipping label at home with a regular inkjet or laser printer, plain paper, and packing tape. Compare carrier rates first, buy postage online through a carrier or marketplace, download the label PDF, print it clearly, and tape it flat to your package without covering the barcode. If you don’t own a printer, USPS, UPS, and FedEx all offer QR-code options that let a carrier location print the label for you.
The Short Answer: Yes, You Can Do This
Printing a shipping label at home with no experience is simpler than most people think. You do not need a special printer. You do not need sticker paper. You do not need to stand in line at the Post Office.
For a one-time shipment, all you need is a computer or phone, internet access, a way to weigh and measure your package, a regular printer, paper, and packing tape. The entire process takes about ten minutes once you understand the steps.
Here is the fastest version:
- Pack your item.
- Measure and weigh the package.
- Compare carrier rates.
- Buy postage online.
- Download the label PDF.
- Print it on regular paper.
- Tape it flat to the box without covering the barcode.
- Drop it off or schedule a pickup.
The rest of this guide explains each step in detail, covers what to do if you don’t have a printer, and walks through the mistakes that trip up first-timers.
Shipping Label Glossary for Beginners
Before getting into the steps, here are the terms you’ll see everywhere. Beginners often confuse these, and that confusion causes most first-time problems.
Shipping label: The document attached to your package that tells the carrier where it’s going. It includes the sender address, recipient address, tracking number, barcode, service level, and sometimes weight. FedEx defines it as the information a carrier needs to move a package from origin to destination, including a scannable barcode and tracking number.
Postage: The amount you pay for the shipping service. The label itself is usually free to generate. The shipping service attached to it is what costs money. EasyPost and The Fulfillment Lab both make this distinction: creating a label is free, but postage must be paid.
Prepaid label: A label where the postage has already been paid by someone else, typically a retailer or marketplace. You just need to print it (or show the QR code) and hand over the package. For a deeper explanation, see our USPS prepaid label guide.
QR code / mobile barcode: A digital code that lets a carrier location retrieve and print the label for you. It is not the label itself. You use one or the other, not both.
Tracking number: A unique identifier assigned to your shipment. It lets you and the recipient follow the package’s progress.
4x6 label: The standard shipping label size used by thermal printers and most carrier label formats. If you’re printing on regular 8.5x11 paper, you’ll print the label on a full sheet and cut it down or fold it.
Ship date: The date printed on the label. USPS warns that items should be mailed on the selected shipping date and that labels with stale dates may be returned.
Thermal printer: A printer that uses heat instead of ink or toner. Useful for frequent shippers, completely unnecessary for a first-time shipment.
Drop-off scan: The scan a carrier performs when they accept your package. This is your proof the package entered the system.
What You Need Before Printing
Gather these before you start. Trying to create a label without them leads to errors and wasted time.
- Packed item in a box or mailer. Measure after packing, not before, because packaging changes weight and dimensions.
- Sender (your) address.
- Recipient address. Double-check spelling, apartment numbers, and ZIP codes. Our guide on how to address a package correctly covers the formatting details.
- Package weight. A kitchen scale works for small items. For heavier boxes, UPS suggests a bathroom-scale workaround: weigh yourself holding the package, then weigh yourself alone and subtract.
- Package dimensions (length, width, height in inches).
- Payment method (credit or debit card for buying postage).
- A printer, or access to a QR-code printing location. More on the no-printer option below.
- Clear packing tape. Not masking tape, not duct tape. UPS specifically says to seal with plastic or nylon tape at least two inches wide.
Step-by-Step: How to Print a Shipping Label at Home
Step 1: Pack the Item First
This sounds obvious, but many beginners try to buy postage before packing. The problem? Your box choice changes the weight and dimensions, which changes the price.
If you’re reusing an old box, remove or cover all old labels and barcodes. UPS tells shippers to remove old labels or shipping markings before sealing. A leftover barcode from a previous shipment can confuse sorting machines.
Step 2: Measure and Weigh the Package
Carriers price packages based on weight, dimensions, distance, and service level. Guessing leads to one of two problems: you overpay, or the carrier charges you an adjustment fee after the fact.
Use a tape measure for the outside dimensions of the box. Round up to the nearest inch. Weigh the package on a scale after it’s fully packed and sealed.
If you want to understand how carriers calculate prices (including dimensional weight), our guide on how to calculate shipping costs breaks it down.
Step 3: Compare Rates Before Buying Postage
This is the step most beginners skip, and it costs them money. The price difference between carriers for the same package can be significant, especially when you factor in online discounts versus retail counter prices.
Online Shipping Calculator lets you compare estimated rates from USPS, UPS, FedEx, Sendle, and DHL on one page. Enter your origin, destination, and package details, and see your options side by side. No account required.
The site does not sell postage or print labels. It helps you research the cheapest or fastest option, then you buy the actual label through the carrier website, a marketplace, or a third-party shipping software provider.
This matters because once you buy a label from one carrier, switching means voiding the old label and starting over. USPS says Click-N-Ship labels can be eligible for refunds within 30 days if they haven’t received a barcode scan. UPS allows voids within 90 days, with no void processed after 180 days. Why deal with that when you can compare first?
If you’re curious whether a flat rate box might be cheaper for your shipment, check our flat rate vs regular shipping comparison.
Step 4: Buy the Label (Postage)
You have several options for purchasing:
Directly from a carrier website:
- USPS Click-N-Ship lets account holders create, print, and pay for shipping labels. A free USPS.com account, a computer, and a standard printer are the basic requirements.
- UPS.com lets you create labels by entering ship-from, ship-to, package details, service options, and payment, then print at home or at The UPS Store.
- FedEx.com lets occasional shippers create a label as a guest without a FedEx account using a credit card.
Through a marketplace: If you’re selling on Etsy, eBay, Mercari, or Poshmark, the platform usually has a built-in label-buying option. The label is linked to the order and often comes at a discounted rate.
Through shipping software: Tools like Shippo, ShippingEasy, ShipStation, Easyship, and Stamps.com offer discounted commercial rates, sometimes 40% to 80% below retail counter prices. If you want to understand those discounts better, see our shipping discounts guide.
Step 5: Download the Label PDF
After paying, you’ll get a label file, almost always a PDF. Save it to your computer before printing. Do not try to print directly from the “label created” confirmation page if the carrier gives you a download option.
USPS Click-N-Ship lets users save labels as PDFs and print now or later. Saving first protects you if the browser crashes, the session expires, or you need to reprint.
Step 6: Print the Label Clearly
Here’s where beginners worry they need special equipment. You don’t.
Regular printer (inkjet or laser): Print the PDF on standard 8.5x11 paper. USPS accepts plain white paper for Click-N-Ship labels, and UPS supports standard desktop laser and inkjet printers. USPS recommends printing at 600 DPI or higher with inkjet printers for best quality.
Adhesive label sheets: Half-sheet adhesive labels (the peel-and-stick kind) work with regular printers and save you from taping. They’re a nice upgrade but not required.
Thermal printer: If you own one, choose the 4x6 label format in your carrier or marketplace settings and print at 100% scale. If you don’t own one, don’t buy one for a single package.
The most important thing: the barcode must be sharp and readable. If it’s blurry, faded, or pixelated, reprint it.
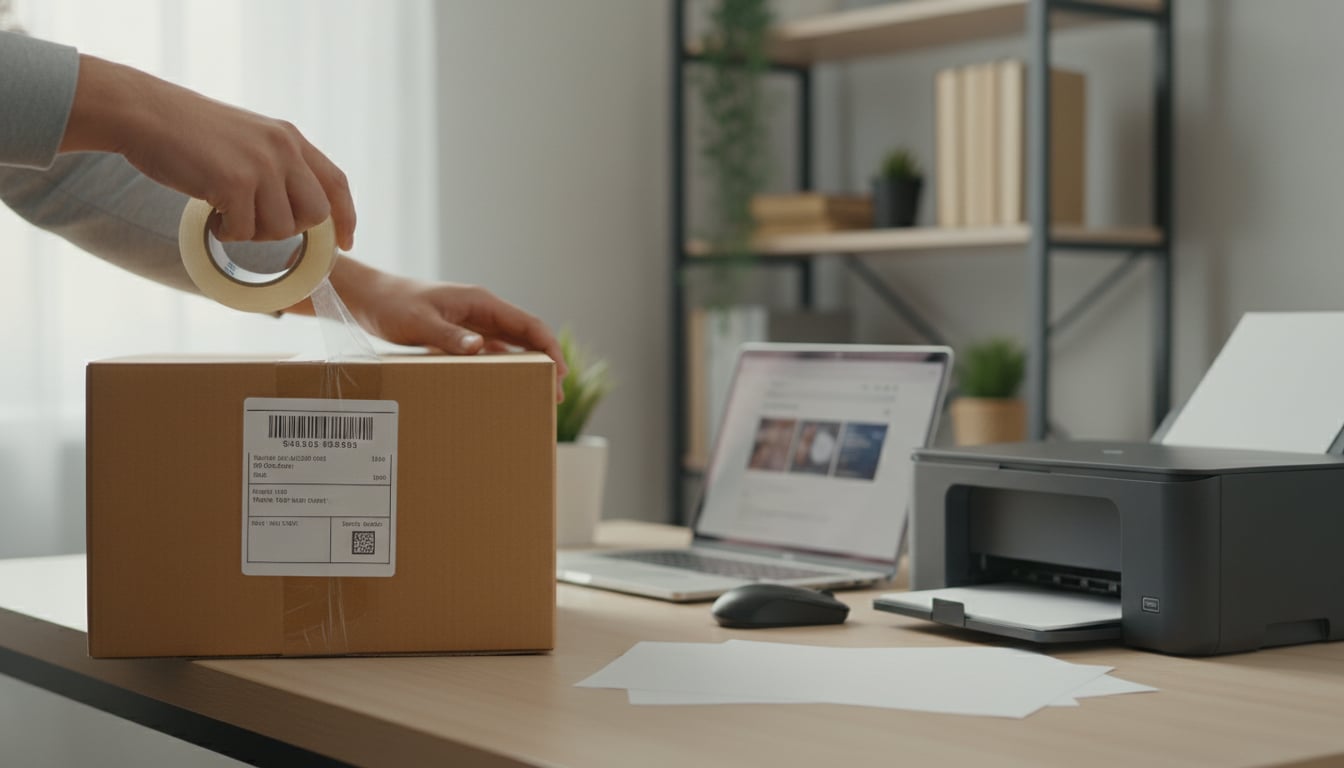
Step 7: Attach the Label to the Package
Cut the label out if you printed on a full sheet of paper. Then:
- Place it on the largest flat surface of the box.
- Tape all four edges with clear packing tape.
- Do not fold the label around a corner or over a seam.
- Do not cover the barcode with tape. USPS specifically says tape can make labels harder for processing equipment to read. FedEx similarly advises avoiding taping over or covering the label.
- Remove or cover any old barcodes on a reused box.
Practitioners on Reddit regularly mention that paper labels taped poorly can fall off during transit, that tape glare can interfere with scanning, and that arriving at USPS with a package not fully sealed and labeled is a common beginner mistake. Bring your package ready to go.
Step 8: Drop Off or Schedule a Pickup
Once the label is on the box, you need to get the package to the carrier.
- USPS: Drop off at any Post Office, hand to your mail carrier, leave it for pickup, or use a blue collection box (for smaller packages). USPS Ground Advantage and Priority Mail include free Package Pickup at your home or office. See our guide on how to schedule a USPS pickup.
- UPS: Drop off at a UPS Store, UPS Access Point, or UPS Drop Box. Some services allow scheduled pickup.
- FedEx: Drop off at a FedEx Office, FedEx Ship Center, or one of their 56,000+ retail and contactless drop box locations.
Ask for a receipt or drop-off scan if proof of shipment matters to you (it usually does for marketplace sales).
How to Print a Shipping Label Without a Printer
Not having a printer is the single biggest blocker for people trying to print a shipping label at home with no experience. The good news: every major carrier now offers a workaround.
USPS: Label Broker
USPS Label Broker lets you bring a QR code or Label Broker ID to a participating Post Office location and have USPS print the label. If you buy through Click-N-Ship, choose “Print later at Post Office” to get the QR code by email.
If someone sent you a Label Broker ID (an 8 to 10 character code), you can enter it along with your ZIP code on the USPS Label Broker page to download the label, or bring it to a supported location.
USPS also offers a Label Delivery Service for certain products where USPS prints and delivers the label to you for $1.65.
UPS: The UPS Store and Mobile Barcode
UPS says users can print labels at home or at The UPS Store. For return shipments, UPS supports scanning and printing by mobile barcode at a UPS location.
FedEx: Mobile App QR Code
The FedEx Mobile app can generate a QR code after you create a label. Bring the QR code to an eligible FedEx Office or FedEx Ship Center and they’ll scan and print it. A small fee may apply when emailing a label to a FedEx Office for printing.
If You Only Have a PDF and No QR Code
This is where things get tricky. Practitioners on Reddit report that USPS retail locations generally need the proper QR code or Label Broker workflow and cannot print an arbitrary PDF you bring in on a USB drive. If you have a PDF but no QR code and no printer, your best options are:
- A public library (many offer printing for a few cents per page)
- An office supply store like Staples or Office Depot
- A FedEx Office or UPS Store (they offer document printing services)
- A friend’s or coworker’s printer
- Your workplace printer
Regular Printer vs Thermal Printer: Which Do You Actually Need?
This decision depends entirely on how often you ship. A thermal label printer is a convenience upgrade, not a beginner requirement.
| Shipping frequency | Recommended setup | Why |
|---|---|---|
| One package or occasional returns | Regular printer, plain paper, packing tape | Cheapest option, no new equipment needed |
| A few packages per month | Regular printer with half-sheet adhesive labels | Cleaner look, no taping, uses your existing printer |
| Several packages per week | 4x6 thermal printer | No ink costs, fast, adhesive labels peel and stick |
| Dozens of packages per day | Thermal printer with shipping software and batch workflows | Speed and efficiency become essential at this volume |
An Etsy Community seller shared that they print around 40 labels per week on a regular home-office printer with no quality issues, while some thermal printer users actually report more quality problems. Clear, scannable output matters more than printer type.
Reddit sellers commonly say they started with regular paper and tape, then upgraded after shipping became a weekly habit. Many warn that taped paper labels can fall off if not secured properly, while others point out that thermal printers eliminate the annoyance of cutting, taping, and buying ink.
A LinkedIn article from Australia Post makes a similar point: thermal printers are popular with established small and medium ecommerce businesses, while new and small operations often use standard laser or inkjet printers.
The bottom line: do not buy a thermal printer for one package. Buy one when cutting and taping labels becomes part of your weekly routine. If you reach that point, our guide on the best shipping label printers for home use can help you choose.
How to Attach a Label the Right Way
Getting the label onto the box correctly is the part most guides rush through. But a label that falls off, wrinkles, or can’t be scanned will cause your package to be delayed or returned.
Do this:
- Place the label on the largest flat surface of the box.
- Tape all four edges securely with clear packing tape.
- Make sure the entire barcode is visible and flat.
- Remove or cover any old barcodes, labels, or shipping markings.
Don’t do this:
- Don’t wrap the label around an edge or corner.
- Don’t place it over a box seam where tape or folds distort it.
- Don’t cover the barcode with shiny tape (it causes glare for scanners).
- Don’t use masking tape, duct tape, or scotch tape to attach it.
- Don’t cover what USPS calls the “Postal Use” area on their labels.
If you’re using adhesive label paper, peel and stick it flat, then run one layer of clear tape over the entire label (excluding the barcode) for weather protection.
Common Beginner Mistakes (and How to Avoid Them)
These are the problems that trip up first-timers when printing a shipping label at home with no experience. Every one of them comes from real complaints in carrier forums, Reddit threads, and marketplace communities.
| Mistake | What happens | How to fix it |
|---|---|---|
| Guessing the weight | Carrier charges a postage adjustment after delivery | Weigh the package on a scale before buying the label |
| Wrong address | Package gets returned or delivered to the wrong person | Double-check every field; create a new label if wrong (old labels cannot be altered) |
| Label printed too small | Barcode won’t scan | Set print scale to 100%, not “fit to page”; choose the right paper size |
| Label is cut off | Missing information or partial barcode | Check paper size settings and orientation before printing |
| Barcode is blurry | Scanner can’t read it; package gets stuck | Reprint from the saved PDF; use higher print quality; clean thermal printer head |
| Taping over the barcode | Scanner can’t read through shiny or wrinkled tape | Tape around the barcode, not over it |
| Missed the ship date | Carrier may reject or return the package | USPS warns stale labels may be returned; create a new label with today’s date |
| Printed two copies | Confusion about which to use | Use only one; discard the duplicate since postage is tied to one unique label |
| Thinking QR code = label | Showing up at the carrier with a QR code taped to the box | The QR code is for the carrier to print the label; it does not go on the package |
| No tape at drop-off | USPS and other carriers generally do not provide free tape | Seal and label your package completely before you leave home |
eBay and Etsy community discussions show that many sellers struggle with labels printing sideways, too small, or as a full 8.5x11 PDF when they expected a 4x6. The fix is almost always in the print format settings on the shipping label screen, not in the printer itself.
Carrier Quick-Start Guides
USPS Quick Start
- Create a free account at USPS.com.
- Go to Click-N-Ship.
- Enter sender and recipient addresses, package weight, and dimensions.
- Choose a service (Ground Advantage, Priority Mail, etc.).
- Pay with a credit or debit card.
- Print at home, save the PDF, or choose Label Broker for no-printer printing.
- Drop off at a Post Office or schedule a free USPS pickup.
UPS Quick Start
- Go to UPS.com and select “Create a Shipment.”
- Ship as a guest or log into a UPS account.
- Enter ship-from and ship-to addresses.
- Enter package weight, dimensions, and type.
- Choose a service level and pay.
- Print at home or at The UPS Store.
- Drop off at a UPS location or schedule a pickup.
FedEx Quick Start
- Go to FedEx.com or open the FedEx Mobile app.
- Select “Ship” and create a label. Guests can create one without an account.
- Enter sender and recipient details, package weight, and type.
- Choose a service and pay.
- Print at home, or get a QR code from the mobile app to bring to a FedEx location.
- Drop off at any FedEx location.
Notes for Marketplace Sellers (Etsy, eBay, Mercari)
If you’re selling on a marketplace and printing a shipping label at home with no experience, there are a few extra things to know.
Where to find your label: Check the order details page in your seller dashboard. The label is usually a PDF download link or a QR code. If you can’t find it, check your email (including spam), the app’s shipping section, and the carrier’s label history page.
Marketplace labels vs carrier labels: When you buy a label through Etsy or eBay, the postage is already included and often discounted. You just need to print it and attach it.
QR code confusion: Mercari and some other platforms give sellers a QR code instead of a printable label. Practitioners on Reddit clarify that the QR code is just a digital way for the Post Office to print the label. If you already printed the label, you don’t need the QR code. If you only have the QR code, bring it to a supported carrier location.
Missing or glitched labels: Mercari threads show users solving missing-label problems by entering the Label Broker ID and ZIP code in the USPS Label Broker tool. The Label Broker ID is usually printed under or near the QR code.
4x6 format problems: If you’re using a thermal printer and the label prints sideways, too small, or cut off, check the label format settings in your marketplace’s shipping screen. Most platforms let you toggle between 4x6 (thermal) and 8.5x11 (regular printer) formats. The eBay community has detailed threads where mentors point sellers to the print-format setting as the fix.
A Note on International Labels
Shipping internationally from the U.S. requires customs forms in addition to a shipping label. Carrier workflows usually generate these extra documents automatically when you select an international destination. USPS Click-N-Ship notes that international labels with customs forms have special printing requirements.
If you’re shipping to Canada or Mexico, our guides on shipping to Canada and shipping to Mexico cover the additional steps.
FAQ
Can I print a shipping label at home with a regular printer?
Yes. USPS accepts plain white paper for Click-N-Ship labels, and UPS supports standard desktop laser and inkjet printers. You do not need a thermal printer or special label paper for occasional shipping.
Can I just tape a paper label to the box?
Yes, but do it carefully. Tape the edges securely with clear packing tape. Do not tape over the barcode. USPS warns that tape can make labels harder for processing equipment to read.
Is a QR code the same as a shipping label?
No. A QR code is a digital reference that lets a carrier location retrieve and print the actual label. You use a printed label or a QR code, not both. The QR code does not get taped to the package.
Will USPS print my shipping label for me?
USPS can print supported Label Broker labels at participating Post Office locations when you bring a valid QR code or Label Broker ID. They cannot print arbitrary PDF files you bring on a phone or USB drive.
What if I entered the wrong address on my label?
You cannot edit a printed shipping label. USPS says the online label cannot be altered and must be used as printed. Create a new label with the correct information and request a refund for the old one if it hasn’t been scanned.
Do I have to pay at the Post Office after printing a label at home?
No. If you printed a prepaid shipping label (meaning you already paid for postage online), you owe nothing at drop-off. You may be charged only if the package details are wrong, for example, if it weighs more than what you entered.
How long is a shipping label valid?
It depends on the carrier. USPS warns that items should be mailed on the selected ship date. If you miss the date, create a new label and request a refund for the original.
Do I need to buy a thermal printer?
Not for your first shipment or occasional use. A thermal printer is worth considering only if you ship several packages per week and want to stop dealing with ink, cutting, and taping. For a breakdown of options, see our best shipping label printers guide.
Wrapping Up
Learning how to print a shipping label at home with no experience really comes down to understanding that the label and the postage are two different things, that a regular printer works fine, and that the barcode needs to be flat and scannable. That’s it.
The biggest money-saving move is comparing rates before you buy the label, not after. Online Shipping Calculator makes that comparison free and fast. Enter your package details, see side-by-side rates from USPS, UPS, FedEx, and other carriers, then go buy your label from whichever option makes the most sense for your shipment.
If this is your first package, print on regular paper, tape it down properly, and drop it off. If it becomes a regular thing, you can explore discounted commercial rates through shipping software or upgrade to a thermal printer. But for right now, the simplest path is the right one.